Магазинам

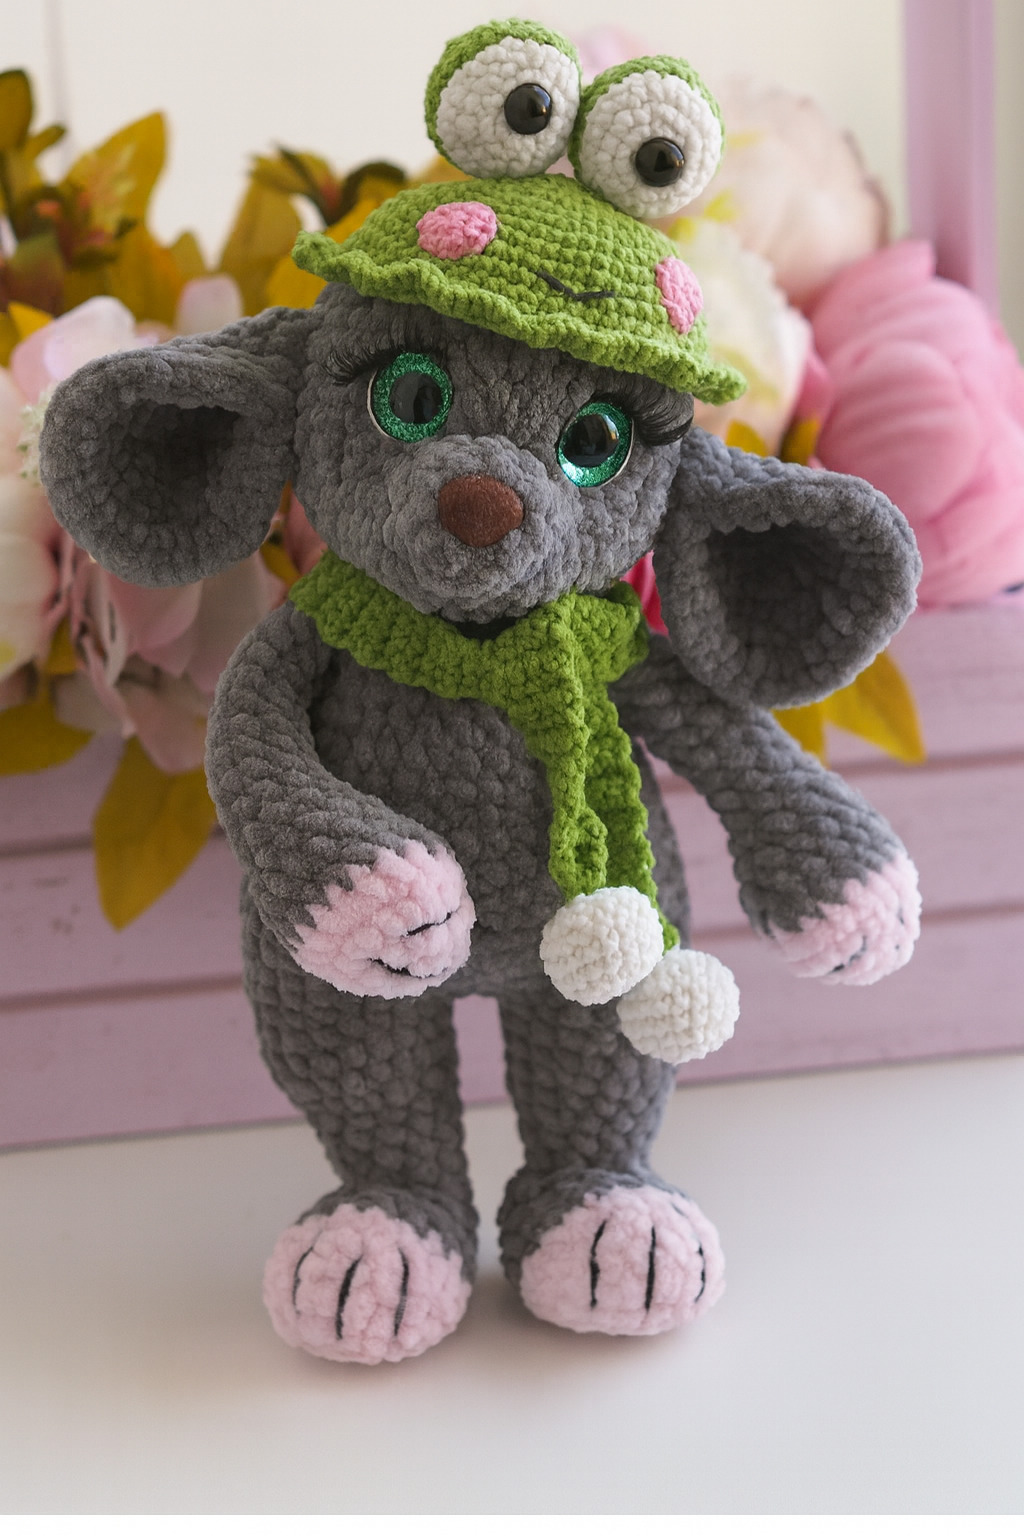
Мастер-класс “Мышка Мэри”
1. Плюшевая пряжа:
LaVita Velur #6019 – 1 моток (основной цвет)
Lavitayarn #4005 – немного в качестве дополнительногоцвета
2. Крючок 3 или 3.5
3. Хлопковая или полу хлопковая нить для утяжкимордочки,вышивки и пришивания деталей.
4. Глаза 16 мм.
5. Нос 14 - 16 мм.
6. Наполнитель.
7. Булавки портновские.
8. Ножницы.
9. LaVita BabyCotton Пряжа для одежды:
белого (01)
зеленого (69)
розового (20) цветов
10. Крючок 2.
11. Глазки для шапочки 8 мм.
Правая и левая ручки вяжутся одинаково.
Вязать начинаем дополнительнымцветом.
| Ряд | Цвет ряда | Вязать | Кол-во петель в ряд |
|---|---|---|---|
| 1 | 6 сбн. в КА | 6 | |
| 2 | 6 пр. | 12 | |
| 3 | (1 сбн., пр.) * 6 | 18 | |
| 4 | 18 сбн. | 18 |
В 5 ряду меняем цвет на основной (цвет тела)
| 5 | 18 сбн. | 18 | |
| 6 | 4 сбн., уб., 7 сбн., уб., 3 сбн. | 16 | |
| 7 | уб., 12 сбн., уб. | 14 |
Набиваем ручки не плотно до 7 ряда.
При набивании формируем кулачки и ладошки.
| 8 | 2уб., 6 сбн., 2 уб. | 10 | |
| 9-17 | 10 сбн. (9 рядов) | 10 |
Провязываем несколько сбн. для выравнивания вязания.
Складываем деталь пополам и провязываем 4 сбн.
Ниточки обрезаем и прячем внутри детали.

| Ряд | Цвет ряда | Вязать | Кол-во петель в ряд |
|---|---|---|---|
| 1 | 6 сбн. в КА | 6 | |
| 2 | 6 пр. | 12 | |
| 3 | (1 сбн., пр.) * 6 | 18 | |
| 4-5 | 18 сбн. (2 ряда) | 18 |
| 6 | (7 сбн., уб.) * 2 | 16 | |
| 7 | (6 сбн., уб.) * 2 | 14 | |
| 8-9 | 14 сбн. (2 ряда) | 14 | |
| 10 | (5 сбн., уб.) * 2 | 12 | |
| 11 | 12 сбн. | 12 | |
| 12 | 6 уб. далее стягиваем отверстие, нить обрезаем и прячем. | 6 |

Далее делаем разметку для ножек с помощью булавок:
Отсчитываем 8 рядов от начала вязания и между 8 и 9 рядами ставим булавку.
Затем еще через 3 ряда ставим еще булавку.
В общей сложности нужно отметить 10-ю булавками те места, где будут петли ножек, образуя из булавок круг,как показано на фото.
И начинаем вывязывать ножки по середине сзади. Следите, чтобы маркер шел ровно посередине и вяжем основным цветом (цветом тела)
| Ряд | Цвет ряда | Вязать | Кол-во петель в ряд |
|---|---|---|---|
| 1 | 10 сбн. | 10 | |
| 2 | 2 сбн., пр., 4 сбн., пр., 2сбн. | 12 | |
| 3 | 12 сбн. | 12 | |
| 4 | 3сбн., пр., 4 сбн., пр., 3сбн. | 14 | |
| 5 | 14 сбн. | 14 | |
| 6 | 5 сбн., 4 пр., 5 сбн. | 18 | |
| 7-8 | 18 сбн (2 ряда) | 18 |
Далее на одной ножке нить обрезаем, а на одной оставляем.

1 ряд. Держим ножки лицом от себя, и от правой ножки делаем 1 в.п. и ставим маркер (центр тела). Затем делаем еще 1 в.п. и присоединяемся к левой ножке.
Теперь вяжем 18 сбн. по левой ножке, 2 сбн. по цепочке из воздушных петель, 18 сбн. по правой ножке и 1 сбн. по цепочке из воздушных петель.
Следите, чтобы маркер шел ровно по середине, при необходимости делайте петли смещения
| Ряд | Цвет ряда | Вязать | Кол-во петель в ряд |
|---|---|---|---|
| 2 | пр., 18 сбн., 2 пр., 18 сбн., пр. | 44 | |
| 3 | 44 сбн. | 44 | |
| 4 | 18 сбн., (1 сбн., пр.) * 4, 18 сбн. | 48 | |
| 5-7 | 48 сбн. (3 ряда) | 48 | |
| 8 | 15 сбн., (1 сбн., уб.) * 6, 15 сбн. | 42 | |
| 9-10 | 42 сбн. (2 ряда) | 42 |
По мере вязания набиваем тело и ножки наполнители.
| 11 | (5 сбн., уб.) * 6 | 36 | |
| 12-13 | 36 сбн. (2 ряда) | 36 | |
| 14 | (4 сбн., уб.) * 6 | 30 | |
| 15 | (3 сбн., уб.) * 6 | 24 | |
| 16 | 24 сбн. | 24 |
Хорошо набиваем шею, чтобы она хорошо держала голову.
В 17 ряду будем ввязывать ручки.
Ручки держим так, чтобы ладошка была с внутренней стороны.
| 17 | 4 сбн., 4 сбн. с рукой, 8 сбн., 4 сбн. с рукой, 4 сбн. | 24 | |
| 18 | (2 сбн., уб.) * 6 | 18 | |
| 19-20 | 18 сбн. (2 ряда) | 18 |
Делаем с.с. в следующий сбн., закрепляем нить и обрезаем.


| Ряд | Цвет ряда | Вязать | Кол-во петель в ряд |
|---|---|---|---|
| 1 | 6 сбн. в КА | 6 | |
| 2 | (1 сбн., пр.) * 3 | 9 | |
| 3 | 9 сбн | 9 | |
| 4 | (2 сбн., пр.) * 3 | 12 | |
| 5 | 12 сбн. | 12 | |
| 6 | (1 сбн., пр.) * 6 | 18 |
Теперь следите, чтобы маркер шел ровно посередине. При необходимости делайте петли смещения.
| 7 | 6 сбн., 6 пр. из ПССН, 6сбн. | 24 | |
| 8 | 6 сбн., (1 ПССН., пр. изПССН)* 6, 6 сбн. | 30 | |
| 9 | 6 сбн., (2 ПССН., пр. изПССН)* 6, 6 сбн. | 36 | |
| 10 | 6 сбн., (3 ПССН., пр. изПССН) * 6, 6 сбн. | 42 | |
| 11 | 6 сбн., (4 ПССН., пр. из ПССН) * 6, 6 сбн. | 48 | |
| 12-13 | 48 сбн. | 48 |
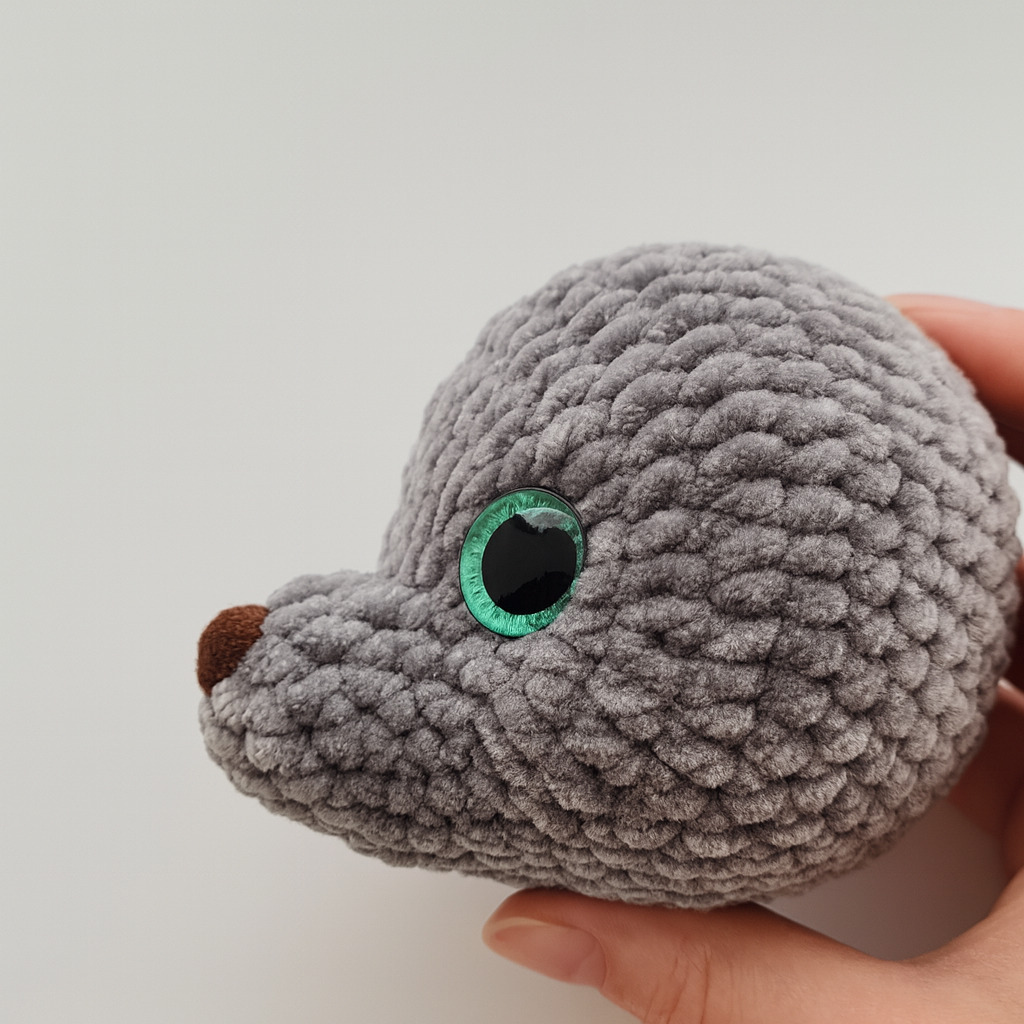
Расположение носа и глаз
Нос ставим во 2 ряду от начала вязания.
Глаза ставим в 7 ряду в начале и в конце прибавокиз ПССН.
Расстояние между глазками 12 ПССН.
Продолжение строки
| 14 | (6 сбн., уб.) * 6 | 42 | |
| 15 | (5 сбн., уб.) * 6 | 36 | |
| 16 | 36 сбн. | 36 | |
| 17 | (4 сбн., уб.) * 6 | 30 | |
| 18 | (3 сбн., уб.) * 6 | 24 | |
| 19 | (2 сбн., уб.) * 6 | 18 | |
| 20 | (1 сбн., уб.) * 6 | 12 | |
| 21 | 6 уб. далее стягиваем кольцо, обрезаем нить, закрепляем ее и прячем. | 6 |
| Ряд | Цвет ряда | Вязать | Кол-во петель в ряд |
|---|---|---|---|
| 1 | 6 сбн. в КА | 6 | |
| 2 | 6 пр. | 12 | |
| 3 | (1 сбн., пр.) * 6 | 18 | |
| 4 | 1 сбн., пр., ( 2 сбн., пр.) * 5, 1 сбн. | 24 | |
| 5 | (3 сбн., пр.) * 6 | 30 | |
| 6 | 2 сбн., пр. ( 4 сбн., пр.) * 5, 2 сбн. | 36 |
Теперь складываем ушко пополам и провязываем 3 сбн. за обе стенки, чтоб в дальнейшем в таком виде пришить их к голове.
Берем иголку с прочной нитью и входим посередине снизу головы(1) и выводим вовнешний угол глаза(2). Затем заходим во внутренний угол тогоже глаза(3) и выводим иглу через соседний сбн. внизу головы(1) (около хвостика нитки).
Заходим иглой в тоже место, где хвостик, и повторяем тоже самое со вторым глазом. И также выводим иглу через соседний сбн.
Затем подтягиваем ниточки, видим как опускаются глазки.
Добиваемся нужного нам эффекта и завязываем нитки на узел между собой. Нити коротко не отрезаем. Мы прячем их внутрь головы.
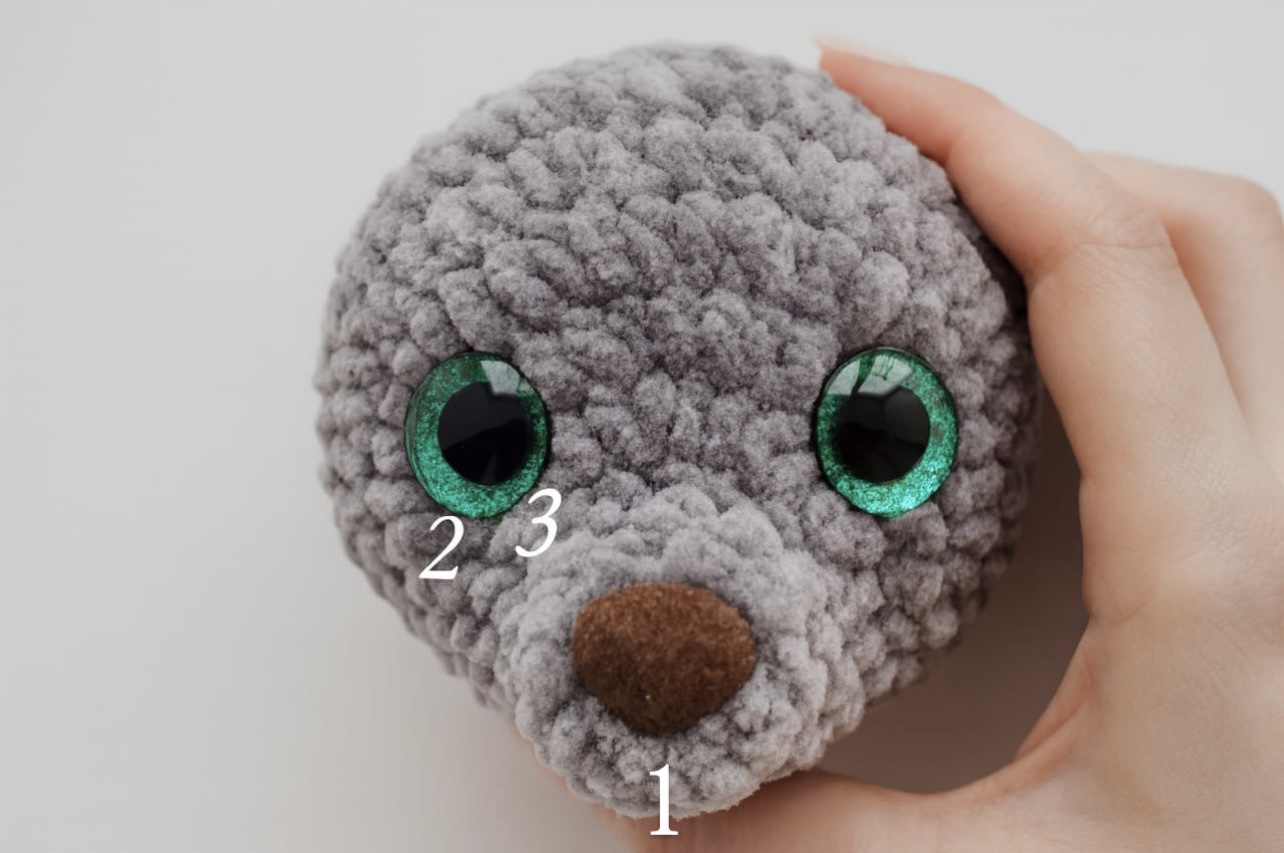
Вводим иголку посередине снизу головы(1) и выводим рядом с внутренним уголком глаза (2).
Тепер прокладывем нить поверх полотна по носику и вводим иглу рядом с внутренним углом другого глаза(3) и выводим иголку посередине снизу головы(1). Далее подтягиваем ниточки и утягиваем носик и завязываем нитки, обрезаем и прячем внутрь головы. Носик получается немного вздернут вверх.

Белки я вышивала не плюшевой пряжей, а белой нитью yarnart jeans.
Берём иголку с ниткой и вводим её снизу головы посередине и выводим её в нижний внешний угол глаза, затем прокладываем ниточку по контуру глаза и вводим иглу в верхний внешний угол глаза.
Тоже самое повторяем со вторым глазом.
Также вводим иголку снизу головы посередине и выводим на 1 ряд в сторону. Затем прокладываем нить поверхнему краю глаза и вводим иголку в верхний внутренний угол глаза. Тоже самое повторяем со вторым глазом.
По желанию можно приклеить накладные ресницы, чтоб взгляд стал более милым
Бровки вышиваем на 2 ряда выше глаз. Я брала нить сложенную вдвое.
Теперь будем пришивать ушки:
Ушки я пришивала обычной швейной нитью чёрного цвета.
Уши пришиваем на уровне глаз, отступив от них 3-4 ряда. И пришиваем уши по кругу.
Сделаем вышивку на ручках и ножках.
Ручки:
Вводим иголку с внутренней стороны руки в 3 ряду от начала вязания и выводим иглу так же в 3 ряду снаружи.
Прокладывааем нить по ручке и сново вводим иглу с внутренней стороны, но теперь выводим её на 2 сбн. в правои на один ряд ниже.
Теперь сново прокладываем нить по ручке и вводим иглу в 3 ряду с внутренней стороны.
И выводим иглу на 2 сбн влево и на один рядниже.
Прокладываем нить по ручке и вводим иглу в 3 ряду с внутренней стороны.
Выводим иглу в первоначальной точке.
Нить отрезаем, хвостики связываем и ниточки прячем внутрь ручки.
Ножки:
С ножками делаем тоже самое.

Сделать его очень просто, берем пряжу и присоединяется нить к телу с помощью соединительной петли и набираем 20 воздушных петель и все!
Хвостик готов!
Нить закрепляем и отрезаем.

Вязание начинаем основным (зеленым) цветом.
| Ряд | Цвет ряда | Вязать | Кол-во петель в ряд |
|---|---|---|---|
| 1 | 6 сбн. в КА | 6 | |
| 2 | 6 пр. | 12 | |
| 3 | (1 сбн., пр.) * 6 | 18 | |
| 4 | ( 2 сбн., пр.) * 6 | 24 | |
| 5 | (3 сбн., пр.) * 6 | 30 | |
| 6 | (4 сбн., пр.) * 6 | 36 | |
| 7 | (5 сбн., пр.) * 6 | 42 | |
| 8 | (6 сбн., пр.) * 6 | 48 | |
| 9 | (7 сбн., пр.) * 6 | 54 | |
| 10 | (8 сбн., пр.) * 6 | 60 | |
| 11-13 | 60 сбн. (3 ряда) | 60 |
14 и 15 ряды будем вязать за передние полупетли.
| 14 | (1 сбн., пр.) * 6 | 90 | |
| 15 | (2 сбн., пр.) * 6 | 120 |
Далее делаем с.с. в следующий сбн., закрепляем нить и обрезаем.

Вязание начинаем дополнительным (белым) цветом.
| Ряд | Цвет ряда | Вязать | Кол-во петель в ряд |
|---|---|---|---|
| 1 | 6 сбн. в КА | 6 | |
| 2 | 6 пр. | 12 | |
| 3 | (1 сбн., пр.) * 6 | 18 | |
| 4 | (2 сбн., пр.) * 6 | 24 |
Глазки ставим во 2 ряду.
В следующем ряду меняем цвет на основной (зеленый) и вяжем за задние полупетли:
| 5 | 24 сбн. | 24 |
Далее вяжем за обе стенки:
| 6-7 | 24 сбн. (2ряда) | 24 | |
| 8 | (2 сбн., уб.) *6 | 18 | |
| 9 | (1 сбн., уб.) * 6 | 12 | |
| 10 | 6 уб. | 6 |
| Ряд | Цвет ряда | Вязать | Кол-во петель в ряд |
|---|---|---|---|
| 1 | 6 сбн. в КА | 6 | |
| 2 | 6 пр. | 12 |
Осталось пришить щечки и глазки к шапочки и готово!!!
1р. Набираем 5 воздушных петель и со 2 петли от крючка вяжем 4 сбн.
2р. поворачиваем вязание, делаем воздушную петлю и вяжем 4 сбн.
Дальше вяжем поворотными рядами и в начале каждого ряда делаем петлю подьема.
3р. - 86р. 4 сбн.
Шарф можно сделать короче или длиннее. Длину регулируйте самостоятельно.
| Ряд | Цвет ряда | Вязать | Кол-во петель в ряд |
|---|---|---|---|
| 1 | 6 сбн. в КА | 6 | |
| 2 | 6 пр. | 12 | |
| 3 | (1 сбн., пр.) * 6 | 18 | |
| 4-5 | 18 сбн. (2 ряда) | 18 | |
| 6 | (1 сбн., уб.) * 6 | 12 | |
| 7 | 6 уб. | 6 |
Стягиваем отверстие, закрепляем нить и обрезаем.

Master Class “Mouse Mary”
1. Plush yarn:
LaVita Velur #6019 – 1 skein (main color)
Lavitayarn #4005 – a small amount for contrast
2. Crochet hook – size 3.0 or 3.5 mm
3. Cotton or cotton-blend yarn – for shaping the face, embroidery, and sewing parts
4. Safety eyes – 16 mm
5. Safety nose – 14–16 mm
6. Stuffing (polyester fiberfill)
7. Sewing pins
8. Scissors
9. LaVita BabyCotton yarn for clothing:
White #1001
Green #8140
Pink #4115
10. Crochet hook – size 2.0 mm (for clothes)
11. Small safety eyes – 8 mm (for the hat)
The right and left arms are worked the same.
Begin with the contrast color.
| Round | Color | Crocheting... | Stitch Count |
|---|---|---|---|
| 1 | 6 sc into MR (magic ring) | 6 | |
| 2 | inc × 6 | 12 | |
| 3 | (1 sc, inc) × 6 | 18 | |
| 4 | 18 sc | 18 |
Change to the main (body) color in Round 5.
| 5 | 18 sc | 18 | |
| 6 | 4 sc, dec, 7 sc, dec, 3 sc | 16 | |
| 7 | dec, 12 sc, dec | 14 |
Stuff the arms lightly up to Round 7.
When stuffing, shape the fists and palms.
| 8 | 2 dec, 6 sc, 2 dec | 10 | |
| 9-17 | 10 sc (9 rounds) | 10 |
Make a few sc stitches to even out the seam.
Fold the piece in half and crochet through both layers: 4 sc.
Fasten off, cut the yarn, and hide the ends inside the piece.
| Round | Color | Crocheting... | Stitch Count |
|---|---|---|---|
| 1 | 6 sc in MR | 6 | |
| 2 | 6 inc | 12 | |
| 3 | (1 sc, inc) * 6 | 18 | |
| 4-5 | 18 sc (2 rounds) | 18 |
| 6 | (7 sc, dec) * 2 | 16 | |
| 7 | (6 sc, dec) * 2 | 14 | |
| 8-9 | 14 sc (2 rounds) | 14 | |
| 10 | (5 sc, dec) * 2 | 12 | |
| 11 | 12 sc | 12 | |
| 12 | 6 dec, tighten the hole, cut the yarn, and hide the tail. | 6 |
Use pins to mark the positions for the legs:
Count 8 rows from the start of crocheting and place a pin between Rows 8 and 9.
Then, count 3 more rows and place another pin.
In total, mark 10 pins in a circle to outline the placement of the legs (see photo for reference).
Start crocheting the legs from the middle of the back. Make sure the stitch marker runs straight down the center. Continue with the main body color.
| Round | Color | Crocheting... | Stitch Count |
|---|---|---|---|
| 1 | 10 sc | 10 | |
| 2 | 2 sc, inc, 4 sc, inc, 2 sc | 12 | |
| 3 | 12 sc | 12 | |
| 4 | 3 sc, inc, 4 sc, inc, 3 sc | 14 | |
| 5 | 14 sc | 14 | |
| 6 | 5 sc, 4 inc, 5 sc | 18 | |
| 7-8 | 18 sc (2 rounds) | 18 |
On one leg, fasten off and hide the tail. On the other, leave the yarn to continue working.
Round 1. Hold the legs with the front side facing you. From the right leg, make 1 chain (ch) and place a stitch marker here — this will mark the center of the body. Then make 1 more chain and join it to the left leg.
Now crochet 18 single crochets (sc) around the left leg, 2 sc along the chain, 18 sc around the right leg, and 1 sc along the chain. (40 sts total)
Make sure the marker stays in the middle. If necessary, adjust with shifting stitches to keep alignment.
| Round | Color | Crocheting... | Stitch Count |
|---|---|---|---|
| 2 | inc, 18 sc, 2 inc, 18 sc, inc | 44 | |
| 3 | 44 sc | 44 | |
| 4 | 18 sc, (1 sc, inc) * 4, 18 sc | 48 | |
| 5-7 | 48 sc (3 rounds) | 48 | |
| 8 | 15 sc, (1 sc, dec) * 6, 15 sc | 42 | |
| 9-10 | 42 sc (2 rounds) | 42 |
Stuff the body and legs with filling as you go.
| 11 | (5 sc, dec) * 6 | 36 | |
| 12-13 | 36 sc (2 rounds) | 36 | |
| 14 | (4 sc, dec) * 6 | 30 | |
| 15 | (3 sc, dec) * 6 | 24 | |
| 16 | 24 sc | 24 |
Make sure to stuff the neck firmly so it will hold the head securely.
Round 17: In this row, we will crochet in the arms.
Arms Attachment and Body Rounds
Hold the arms so that the palms face inward.
| 17 | 4 sc, 4 sc together with the arm, 8 sc, 4 sc together with the other arm, 4 sc | 24 | |
| 18 | (2 sc, dec) * 6 | 18 | |
| 19-20 | 18 sc (2 rounds) | 18 |
Make a slip stitch into the next stitch, fasten off, and cut the yarn.
| Round | Color | Crocheting... | Stitch Count |
|---|---|---|---|
| 1 | 6 sc in MR | 6 | |
| 2 | (1 sc, inc) * 3 | 9 | |
| 3 | 9 sc | 9 | |
| 4 | (2 sc, inc) * 3 | 12 | |
| 5 | 12 sc | 12 | |
| 6 | (1 sc, inc) * 6 | 18 |
Now make sure the stitch marker runs right down the middle. If necessary, add adjustment stitches
| 7 | 6 sc, 6 inc with hdc, 6 sc | 24 | |
| 8 | 6 sc, (1 hdc, inc with hdc) * 6, 6 sc | 30 | |
| 9 | 6 sc, (2 hdc, inc with hdc) * 6, 6 sc | 36 | |
| 10 | 6 sc, (3 hdc, inc with hdc) * 6, 6 sc | 42 | |
| 11 | 6 sc, (4 hdc, inc with hdc) * 6, 6 sc | 48 | |
| 12-13 | 48 sc | 48 |
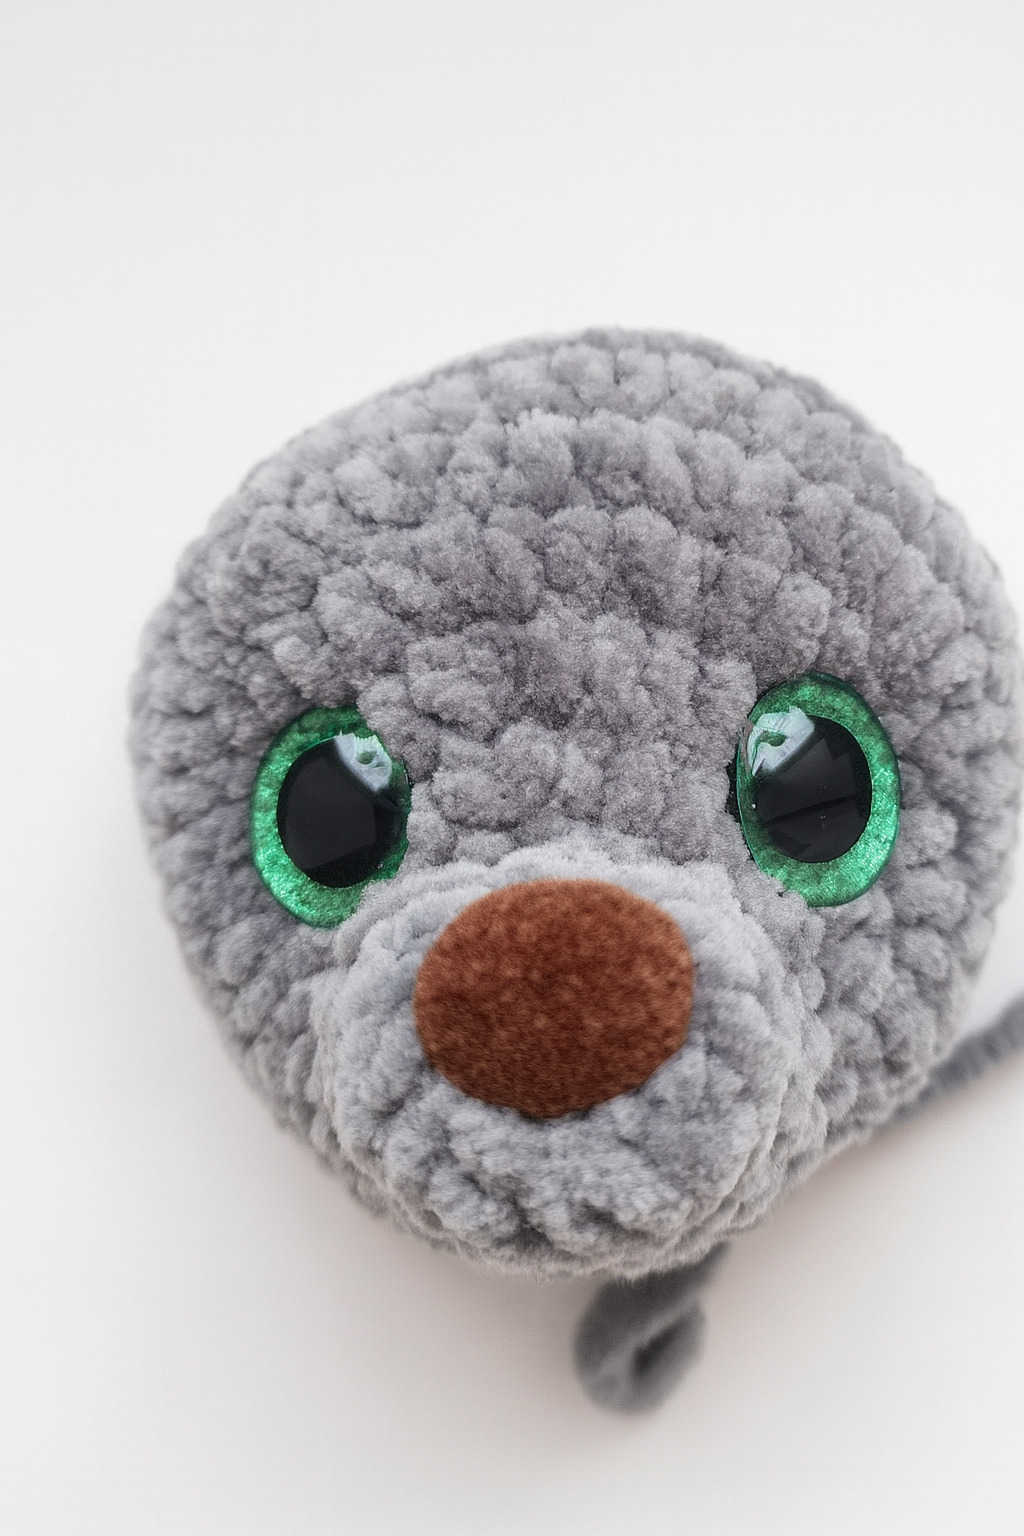
Nose and Eyes Placement
Attach the nose in Row 2 from the beginning of the work.
Insert the eyes in Row 7, at the beginning and end of the increases made with HDC (half double crochet).
The distance between the eyes should be 12 HDC stitches.
Row Continuation
| 14 | (6 sc, dec) * 6 | 42 | |
| 15 | (5 sc, dec) * 6 | 36 | |
| 16 | 36 sc | 36 | |
| 17 | (4 sc, dec) × 6 | 30 | |
| 18 | (3 sc, dec) × 6 | 24 | |
| 19 | (2 sc, dec) × 6 | 18 | |
| 20 | (1 sc, dec) × 6 | 12 | |
| 21 | 6 dec → close the hole, cut the yarn, fasten off, and hide the end inside. | 6 |
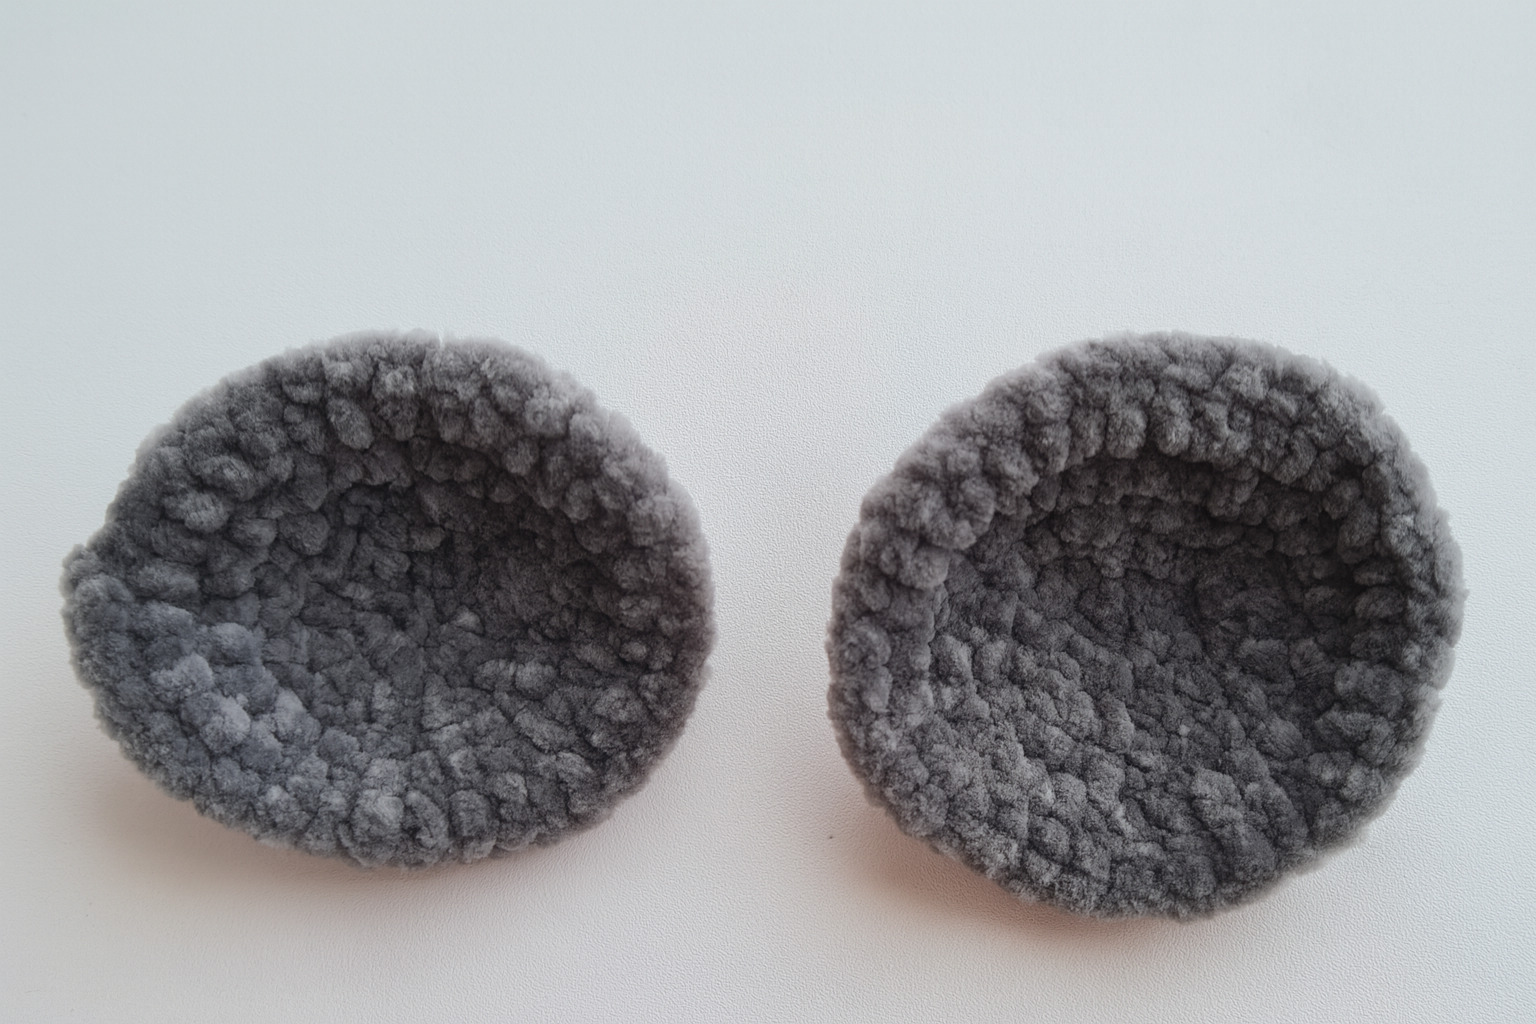
| Round | Color | Crocheting... | Stitch Count |
|---|---|---|---|
| 1 | 6 sc in MR | 6 | |
| 2 | 6 inc | 12 | |
| 3 | (1 sc, inc) × 6 | 18 | |
| 4 | 1 sc, inc, (2 sc, inc) × 5, 1 sc | 24 | |
| 5 | (3 sc, inc) × 6 | 30 | |
| 6 | 2 sc, inc, (4 sc, inc) × 5, 2 sc | 36 |
Now fold the ear in half and crochet 3 sc through both layers.
This will secure the shape so it can be sewn onto the head later in this folded form.
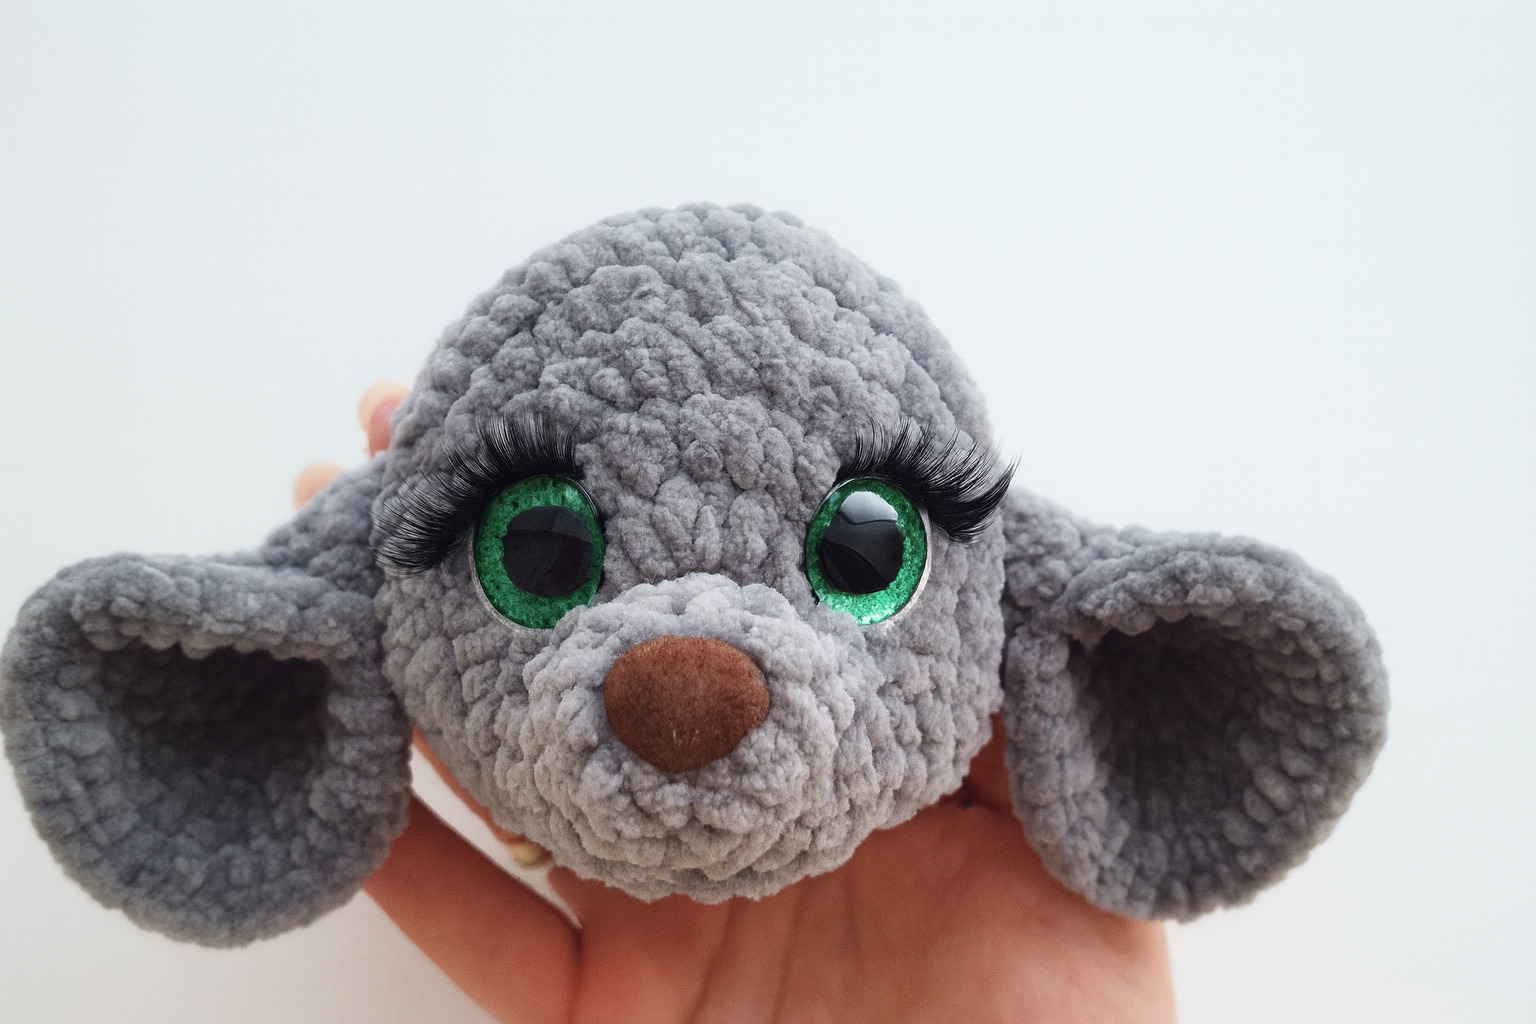
Take a needle with strong thread. Insert the needle into the middle at the bottom of the head (point 1) and bring it out at the outer corner of one eye (point 2). Then insert the needle into the inner corner of the same eye (point 3) and pull it out through the next stitch at the bottom of the head (point 1) (near the yarn tail).
Insert the needle back into the same spot where the tail is, and repeat the same steps for the second eye. Again, pull the needle out through the next stitch.
Now pull the threads tight – you’ll see the eyes sink in slightly. Adjust until you achieve the desired look. Tie the threads together in a knot. Don’t cut them too short – hide them inside the head.
Next, shape the nose. Insert the needle into the middle at the bottom of the head (point 1) and bring it out near the inner corner of one eye (point 2).
Lay the thread across the surface of the nose and insert the needle near the inner corner of the other eye (point 3). Bring the needle back out at the bottom center of the head (point 1).
Pull the threads tight to shape the nose, tying them securely. Trim and hide the ends inside the head. The nose will look slightly lifted upward.
For the eye whites, I didn’t use plush yarn but white YarnArt Jeans yarn.
Take a needle with the white thread and insert it from the bottom center of the head, then bring it out at the lower outer corner of the eye.
Lay the thread neatly along the eye contour and insert the needle again at the upper outer corner of the eye.
Repeat the same steps for the second eye.
Using black thread, insert the needle from the bottom center of the head and bring it out one stitch to the side of the eye.
Lay the thread along the upper edge of the eye and insert the needle again at the upper inner corner of the eye.
Repeat for the second eye.
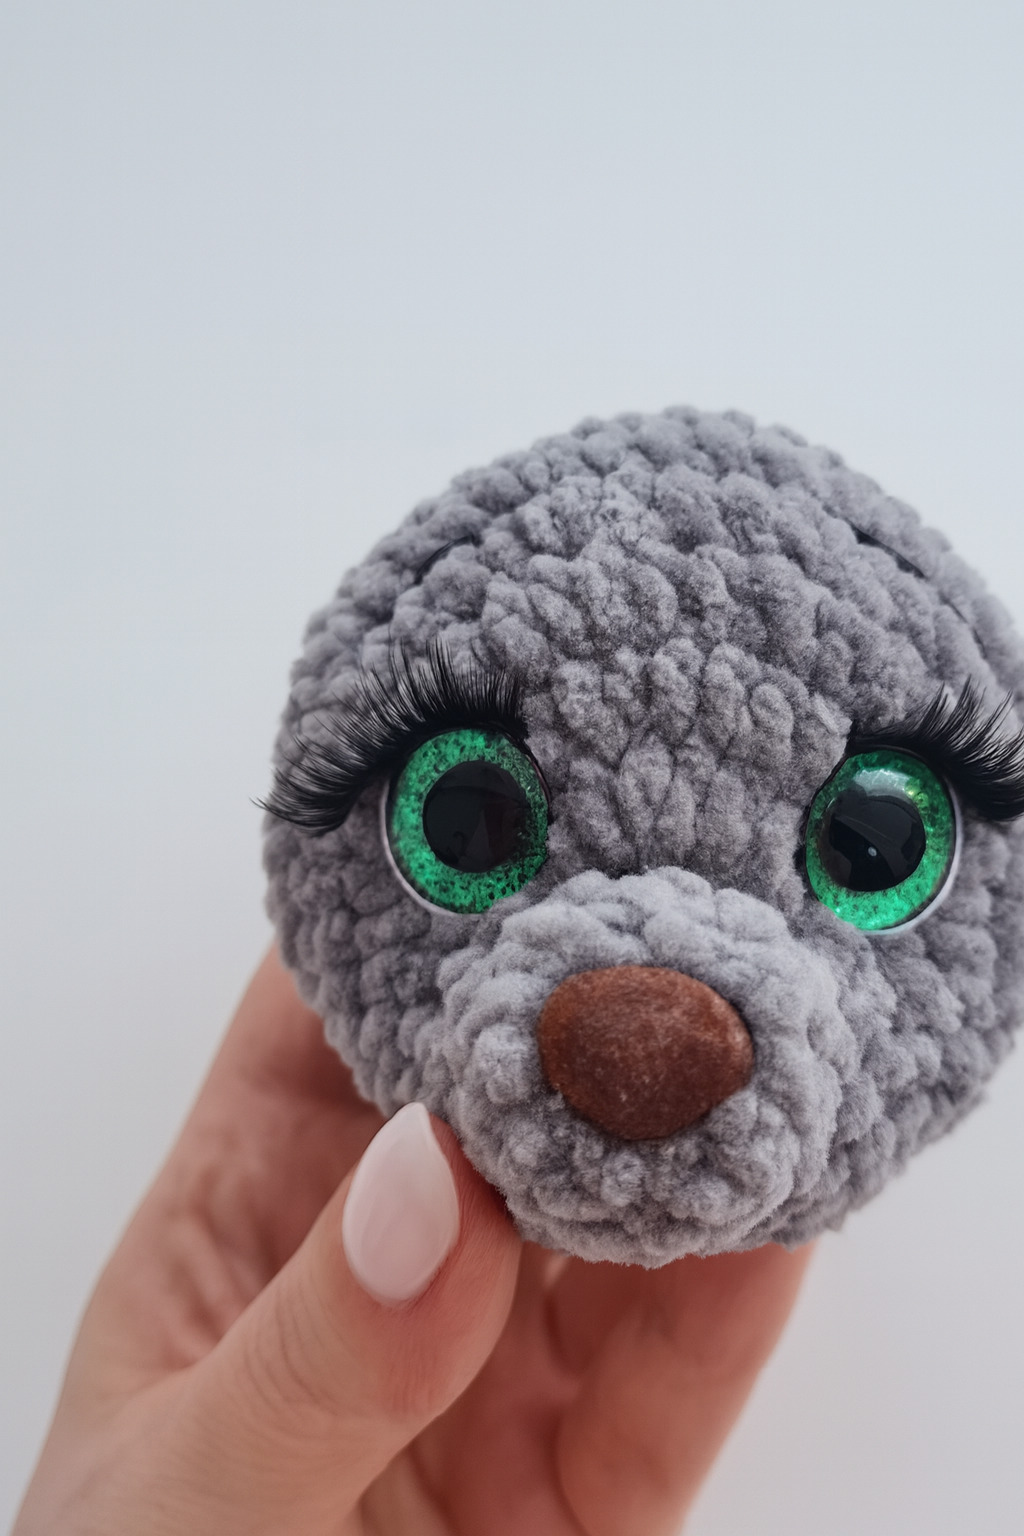
If you’d like to make the eyes look even cuter, you can also glue on false eyelashes.
Embroidering the Eyebrows
Embroider the eyebrows 2 rows above the eyes. I used a thread folded in half to make them thicker and more visible.
Attaching the Ears
We’ll sew the ears using regular black sewing thread. Attach the ears at eye level, leaving a gap of 3–4 rows from the eyes. Secure the ears by stitching around the edge in a circle so they sit firmly in place.
Embroidering on the Arms and Legs
Arms:
Insert the needle with thread from the inner side of the arm at the 3rd round from the beginning of crocheting, and bring it out on the outer side in the same round. Lay the thread across the arm, then insert the needle again from the inner side, this time bringing it out 2 stitches to the right and 1 round lower
Again, lay the thread across the arm, insert the needle into the 3rd round on the inner side, and bring it out 2 stitches to the left and 1 round lower.
Lay the thread across the arm and insert the needle back into the 3rd round on the inner side, bringing it out at the original starting point. Cut the thread, tie the tails together, and hide them inside the arm.
Legs:
Repeat the exact same process on the legs.
It’s very easy to make: take the yarn and join it to the body with a slip stitch, then chain 20 stitches — and that’s it!
The tail is ready!
Secure the yarn and cut it off.
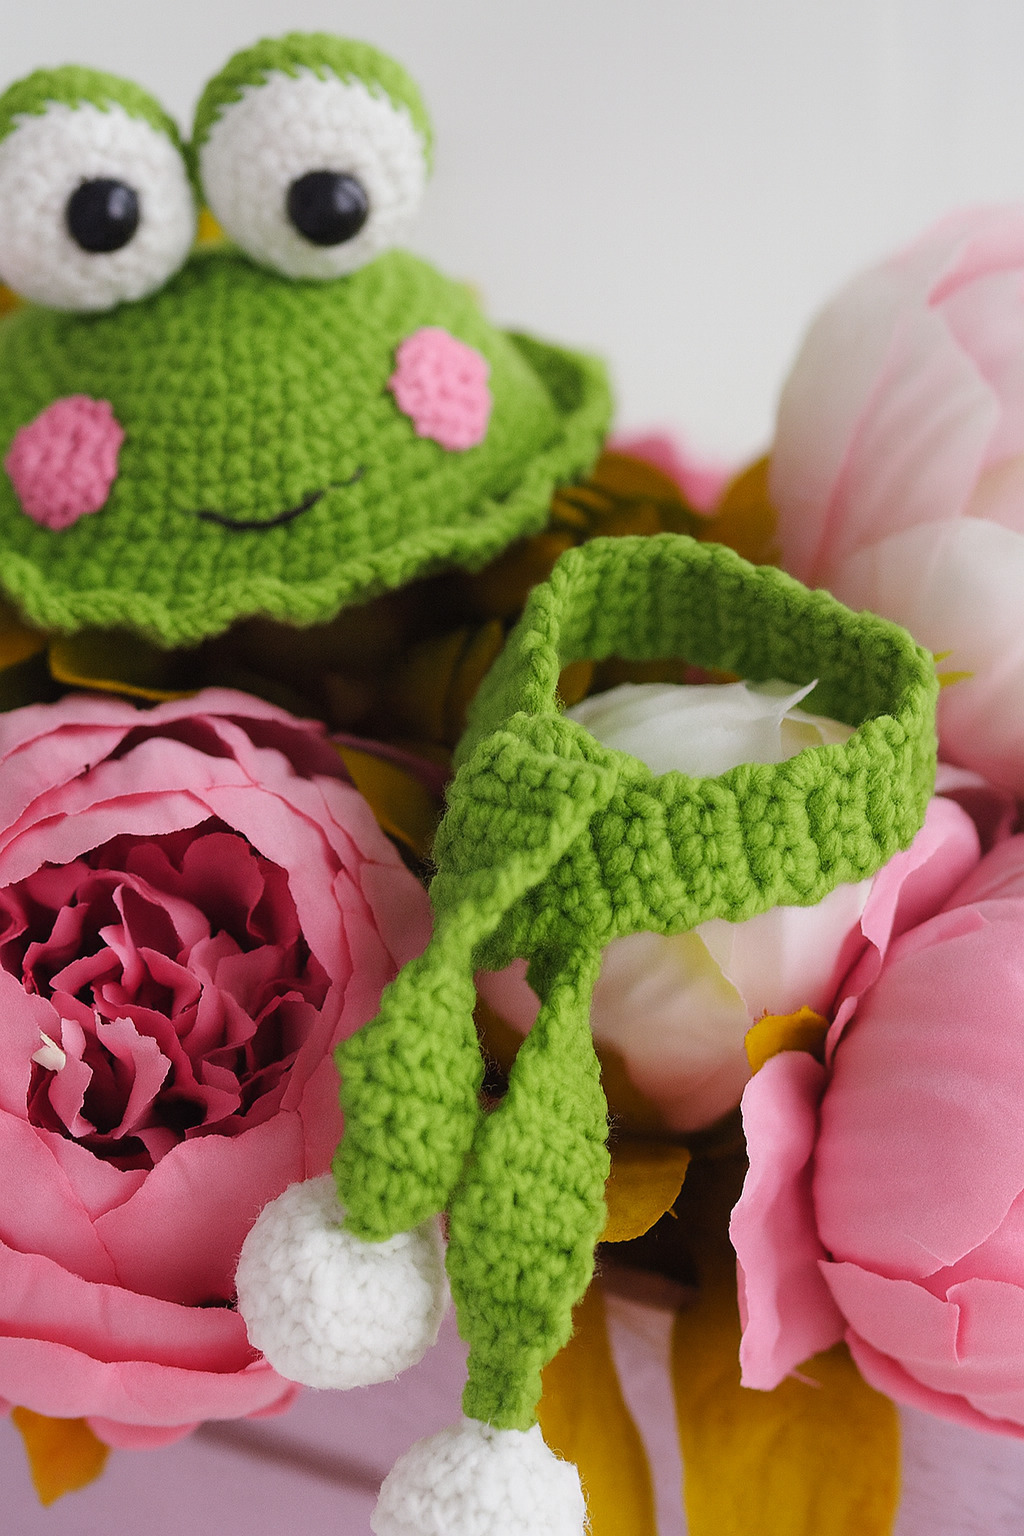
We start crocheting with the main (green) color.
| Round | Color | Crocheting... | Stitch Count |
|---|---|---|---|
| 1 | 6 sc in MR (magic ring) | 6 | |
| 2 | 6 inc | 12 | |
| 3 | (1 sc, inc) * 6 | 18 | |
| 4 | (2 sc, inc) * 6 | 24 | |
| 5 | (3 sc, inc) * 6 | 30 | |
| 6 | (4 sc, inc) * 6 | 36 | |
| 7 | (5 sc, inc) * 6 | 42 | |
| 8 | (6 sc, inc) * 6 | 48 | |
| 9 | (7 sc, inc) * 6 | 54 | |
| 10 | (8 sc, inc) * 6 | 60 | |
| 11-13 | 60 sc (3 rounds) | 60 |
Rows 14 and 15 will be worked in front loops only:
| 14 | (1 sc, inc) * 6 | 90 | |
| 15 | (2 sc, inc) * 6 | 120 |
Finish with a slip stitch in the next sc, fasten off and cut the yarn.
We start crocheting with the additional (white) color.
| Round | Color | Crocheting... | Stitch Count |
|---|---|---|---|
| 1 | 6 sc in MR (magic ring) | 6 | |
| 2 | 6 inc | 12 | |
| 3 | (1 sc, inc) * 6 | 18 | |
| 4 | (2 sc, inc) * 6 | 24 |
Insert the safety eyes in row 2.
In the next row, change the yarn to the main (green) color and work in back loops only:
| 5 | 24 sc | 24 |
Continue working in both loops:
| 6-7 | 24 sc (2 rounds) | 24 | |
| 8 | (2 sc, dec) * 6 | 18 | |
| 9 | (1 sc, dec) * 6 | 12 | |
| 10 | 6 dec | 6 |
| Round | Color | Crocheting... | Stitch Count |
|---|---|---|---|
| 1 | 6 sc in MR | 6 | |
| 2 | 6 inc | 12 |
Then simply sew the cheeks and eyes to the hat – and it’s ready!
1st row: Chain 5, starting from the 2nd chain from hook crochet 4 sc
2nd row: Turn, ch 1, crochet 4 sc
Continue working in turning rows, always making a turning chain at the beginning of each row: 3rd–86th rows: 4 sc
You can make the scarf shorter or longer. Adjust the length as you wish.
| Round | Color | Crocheting... | Stitch Count |
|---|---|---|---|
| 1 | 6 sc in MR (magic ring) | 6 | |
| 2 | 6 inc | 12 | |
| 3 | (1 sc, inc) * 6 | 18 | |
| 4-5 | 18 sc (2 rounds) | 18 | |
| 6 | (1 sc, dec) * 6 | 12 | |
| 7 | 6 dec | 6 |
Tighten the hole, fasten off and cut the yarn.